If you want to make money online in 2017, you need to be on Amazon. If you’re not, you’re leaving money on the table. Amazon has millions and millions of shoppers visit their site every single day. If you can, you should be where the customers already are.
It’s also important to note that it’s not the only way you can be successful online.
Chris Green started the world’s largest Merch Facebook group, Neil created Merch Informer, and I created Merch Ready Designs. We’ve all found a way to provide value to our target audience – and create another stream of income for themselves in the process.
If you’ve thought about spreading your eggs into several baskets, this huge (4,000 word!) post is for you. In this step-by-step guide, I will show you how to create a t-shirt website with WordPress and Printful.
Let’s get started!
Traditional vs. POD
There’s a big difference between creating a t-shirt store – and creating a print on demand t-shirt store. Print on demand means the items are printed as the customer places the order, not in advance.
With this method, you won’t need to carry any inventory. As soon as a customer places an order on your site, the order is automatically sent to the POD (in this guide, I’m using Printful). Printful then prints, packs, and ships the shirt directly to your customer. They even send you shipment notes along the way.
You get paid by your customer, and Printful charges you for the shirt+shipping. You basically get to keep the difference. Keep in mind that you will need to pay Printful before your customers money ends up in your account.
Why Create A Website?
When you have a website, you get to play by your own rules. You have a little more flexibility in the way your business is ran. And more importantly, creating a brand allows you to build a business outside of Amazon. You should never rely solely on Amazon for any business venture.
Let’s say you create a store called Iron First Apparel. You can start using that “brand name” for your Merch listings. That way if your account ever gets terminated, you still have customers that recognize your brand name or will search for you on Google.
Once you start to develop a brand, you can also:
- Create a Facebook or Instagram page to show off your new shirts
- Build an email list, & send “Special Offer” email campaigns
- interact with your customers directly
- Experiment with paid advertising
- Cross-promote with others in your niche
- Convert “abandoned cart” customers
- Become an affiliate to other business in your niche
It takes a bit work upfront, but in the end it’s well worth it. It’s your job to reach your target audience and drive your own traffic to it.
Keep in mind, brands are not built overnight. They are slow & steady business ventures. As long as you can find a few more customers this month than last, you are growing. Compound that growth over a year or two, and you’ll have have a good chunk of money rolling in each and every month.
Creating your own site also gives you the option to sell your website down the road. I sold 4 websites in 2016, and each of those sold for 20-25x monthly profit. Granted, they were niche websites instead of t-shirt sites, but still, to the right buyer, you could expect similar results. That means a website that’s making $100/month consistently could probably be sold for $2,000 to the right buyer.
Thinking Long-Term
Building is brand is longterm project and you should treat it as such. Part of running a business is minimizing expenses. Instead of paying $30/month (or $360/year) for Shopify, you can create a store that does the exact same thing for less than $200, one-time.
If you spend the time learning WordPress now, and you’ll save yourself the money later on.
Regardless of which platform you choose, the end goal is the same: to make money and build a brand. Whether you’re selling t-shirts, tennis shoes or software, having your own brand means you’ve created a business that provides value to someone, somewhere. And that value is something that can be monetized.
Creating your own store is a smart option for a lot of people. Many people are still waiting for their Merch invite, and some may have had their accounts terminated for one reason or another. Others (like myself) have been waiting to tier up for months and are getting bored of only being able to post 25 designs.
Running your own store is the next logical option.
To do this, you’ll need:
- A Domain name – $10
- Web Hosting – $10
- WordPress theme – ~$60
- SSL Certificate – $30-$80
- Basic WordPress knowledge
- A Stripe account
- A Printful account
Don’t worry if you don’t know anything about WordPress or dropshipping. To get you started, I’m going over the main menu items you’ll be using in the backend of WordPress.
Why WordPress?
WordPress is probably the easiest and most powerful website creation platform and CMS (content management system) in existence today. It’s free, easy-to-use, and can be used for any kind of website. Blogs like Merch Pursuits are running on WordPress, membership sites like Merch Ready Designs are, too. So are 74 million other websites in the world!
To put that in perspective, that’s approximately 27% of all websites in existence. I’ve been developing sites on WordPress for the last 4 years, and have hundreds of questions along the way. Any issue you run into can quickly be answered with a simple Google search.
With a userbase this large, someone somewhere has had the same exact question as you.
Because of this, millions of themes & plugins are created specifically for WordPress websites. These themes stylize your site in a certain, and plugins extend the core WordPress functionality.
These reasons makes WordPress/Woocommerce a very attractive solution your t-shirt store needs.
Themes
Finding an theme is one of the most fun parts of building a website. A theme, for those of you who don’t know, is a collection of files that provide the “styling” of your website. Most themes provide:
- the overall design of your site
- font styling
- colors
- menu/widget locations
- pre-made page layouts
Themes can be free or paid, however 99% of the time I recommend purchasing a theme. They range in price from $30-$60. I purchase all of my themes from Themeforest.net.
Quick note: If you’ve ever came across a website you really like the layout of, enter it into What WP Theme Is That, and it’ll tell you what WordPress theme that site is currently using. You can then search for that theme on Themeforest.
Plugins
A plugin is essentially an add-on that extends the functionality of WordPress. Example plugins would be:
- Email popups
- Google Analytics integration
- Social sharing plugins
- Registration & membership plugins
- E-Commerce plugins
To power our Merch by Amazon t-shirt store, we’re going to need a couple plugins: WooCommerce and Printful.
WooCommerce is a free eCommerce plugin that allows you to sell anything on your site. It has an easy-to-use backend for adding new products, customizing your product, uploading product photos, calculating shipping, and much more. This is also the plugin that will be integrated with Stripe, you payment processor.
We will also be installing the Printful plugin. This plugin will automatically send your customers’ order over to Printful where the order will be printed, packed, and shipped.
Still Following?
Good.
With the basics are out of the way, let’s get started with actually creating your website. Read through this entire guide first, and then follow these steps in order
Step 1: Choose a Domain Name
Cost: $9
The first thing you need to do is choose a domain name. I use Namecheap and highly recommend you use them too.
For those you that don’t know, a domain name is essentially your website’s URL. It’s a little more in-depth than that, but for purposes of this guide, that’s all you need to know. The domain “merchpursuits.com” is my website’s domain name.
A domain name is a very important aspect of your business. It’s the first thing a customer sees before they click over to your website. You only get one first impression, make it count. The domain name you choose directly affects how others perceive you and your brand.
Here’s some things to consider when picking a domain name:
- Memorable – Choose a name that is easy to remember for your customers.
- Relevant – Choose a name that is relevant to your mission or niche. This isn’t 100% necessary, but will definitely help.
- Uniqueness – Choose a name that helps you and your brand stand out. Don’t pick a boring name like http://russellstshirts.com. That name doesn’t intrugue me as a customer. Now, a domain like http://ironfistapparel.com is a much better choice. When I think of “ironfist”, I think of rulers, leaders, or people in power. My target audience with a domain like that would be professional men who are in some kind of leadership role.
- Credibility – Get something that ends in .com.When’s the last time you bought a t-shirt from a website ending in .net? Customer’s tend to trust .com’s a little more, which is why I’m advising you to stick with the .com variation. Any TLD is just fine for a blog or something like that, but for an e-commerce store, you want to come off as credible and not as someone who settled for the .net version.
A lot of times, the .com version of your domain name may be unavailable. I urge you to not settle for the .net, .org, or any TLD for that matter. If that means coming up with a new name – you may have to consider that option.
Once you have a few 10-15 ideas, head over to https://namecheap.com and enter them in the huge search bar.
Once you find a domain you like, purchase it, and move onto Step 2. Your new domain should be accessible under Namecheap’s Dashboard.
Important: If you’re goal is to create a “brand”, you should use Namechk.com to see which social media handles are available before purchasing the domain. If you want the handle “ironfistapparel, and you see all those social media handles are taken – you may want to come up with a different name. I typically try to snag the social media handles for Etsy, Facebook, Youtube, Pinterest, Instagram, and Twitter. The rest aren’t nearly as important.
Step 2: Choose a Web Host
Next, you need to host your domain online. To do this, you need to choose hosting provider. For this guide, I’m also using Namecheap because they have an awesome hosting plan. It’s less than $10 for the first year, and allows you to host up to 3 websites at the same time. (Merchpursuits.com receives thousands of visitors every month, and I’m still using Namecheap’s cheapest hosting plan!)
Once you purchase the hosting, you should receive a welcome email within an hour or two that looks like this:
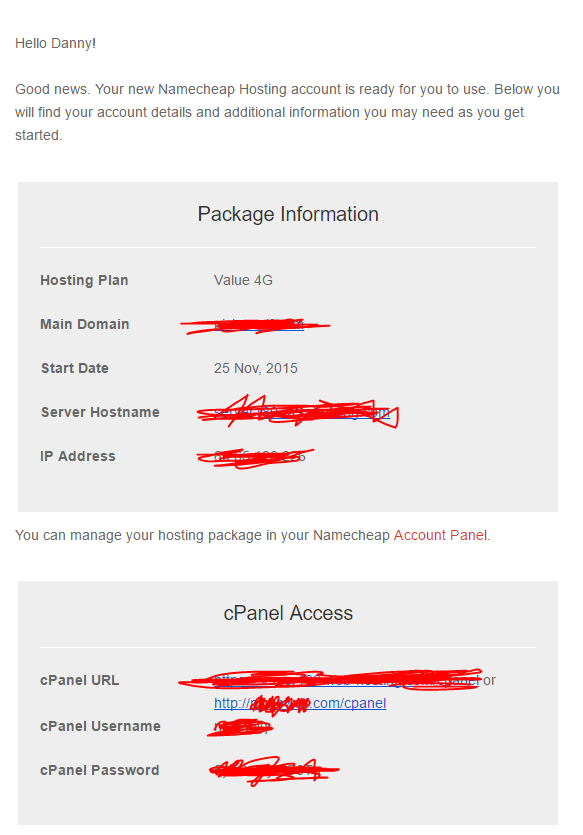
It may take a couple hours to receive this email, so be patient. Namecheap is provisioning an account for you. Once you do receive the email, log back into your Namecheap account. Click Account >Dashboard. Under the Recently active in your Account, you’ll see your newly purchase domain name.
Click Manage.
Under the Nameservers section, click the dropdown and choose ‘Namecheap Web Hosting DNS’. You will then add the following nameservers:
Nameserver 1: dns1.namecheaphosting.com
Nameserver 2: dns2.namecheaphosting.com
NOTE: It may take up to 24-48 hours for the DNS settings to change. This is normal. Namecheap has a very responsive and friendly chat support system to help you with this if you need, but typically they’ll refer you to the below article first. (Have your Support PIN, cpanel user, and Namecheap user handy before opening up a chat window.)
More info on this step here: https://www.namecheap.com/support/knowledgebase/article.aspx/203/32/nameserver-setup-for-shared-packages
Step 3: Purchase A WordPress Theme
While you’re waiting for DNS to reflect, you can start researching WordPress themes. Step 3 involves three things: Finding a theme, purchasing the theme, & installing the theme through cpanel.
Finding a Theme
Head over to Themeforest.net and start researching ecommerce themes. Many of themes will have a demo available, so you can see exactly how the site will look and feel before you purchase.
Find a theme that:
- Is responsive (scales correctly to fit mobile devices)
- Is compatible with WooCommerce (most are)
- Has a lot of sales
- Has been updated recently
- Has a responsive developer
- Accepts refunds
- Optional: Includes a child theme
- Optional: Demo content
Most of the top-rated themes meet this criteria already. It’s worth reading through some of the latest comments to see what others have to say, or to see if the developer responds in a timely manner to customer’s questions.
Many popular WordPress themes allow you import what they call demo content. Demo content is basically a dummy template you can upload to your own site. It creates all the pages for you, creates your homepage, creates a few sample blog posts or dummy products. Importing demo content makes it very easy to create a WordPress site because literally all you’re doing after the import is making very minor changes such as changing font colors(if you want), renaming pages names, updating social icons, and things like that.
Once you purchase a theme, hover over your account name within Themeforest.
- Click Downloads.

2. Download all files and documentation.

If using Chrome, the files will automatically start downloading and will show up in the bottom left-hand corner of your browser, just like any usual download. It will also show up under C:\users\danny\downloads.
Once the download is complete:
3. Click the arrow that says “Show In Folder”.

4. Right-click the theme fill, and tell it to “Extract All”.

5. Take note of the destination path, (you can leave the default path) and click Extract.
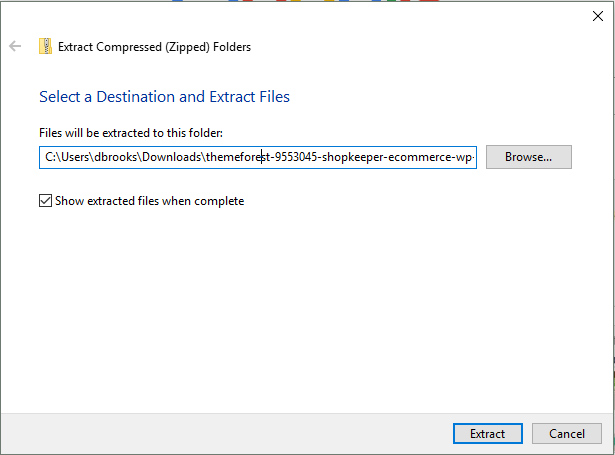
We’ll need these extracted files later on. Next, we need to install WordPress.
Installing WordPress
Open the email you received from Namecheap. You should have a welcome email that looks like the image I posted above that displays your login URL and your cpanel credentials.
You can access cpanel by typing in: http://yourdomain.com/cpanel. You will then see a screen that looks like this:
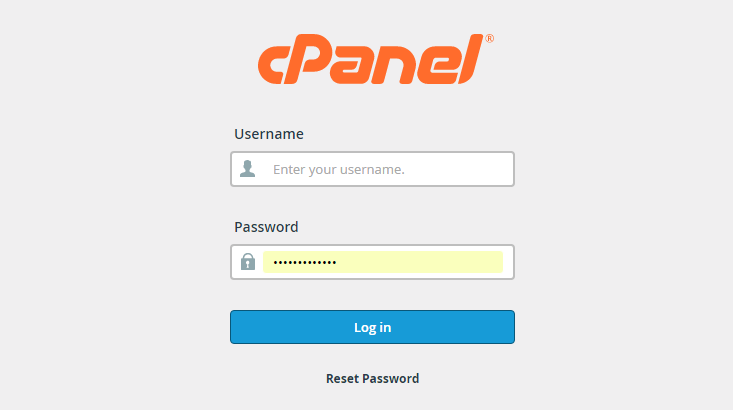
Enter in your cpanel credentials from the Namecheap welcome email, and you’ll see this screen:
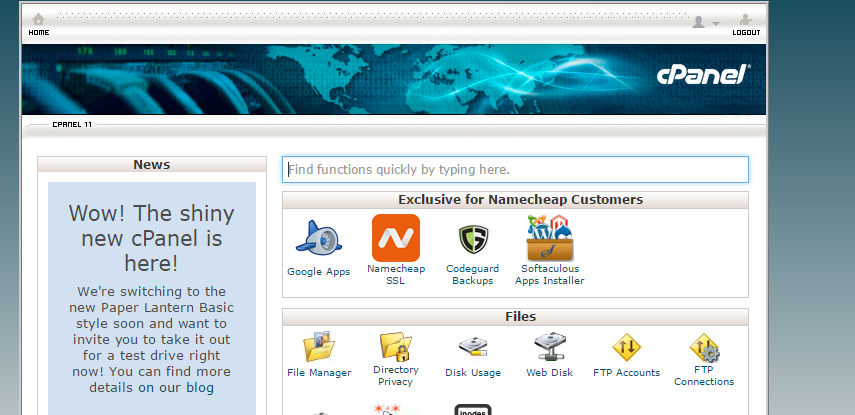
There’s a lot of moving parts within cpanel, so if you don’t know what you are doing, don’t start clicking into things just yet. Just scroll to the very bottom for now. If you want to create an email account, click on Email Accounts. I would create an [email protected] email, or a [email protected], or a [email protected] email.
Up to you though, you don’t have to create any emails yet if you don’t want to.
Scroll to the very bottom, and find the WordPress script.
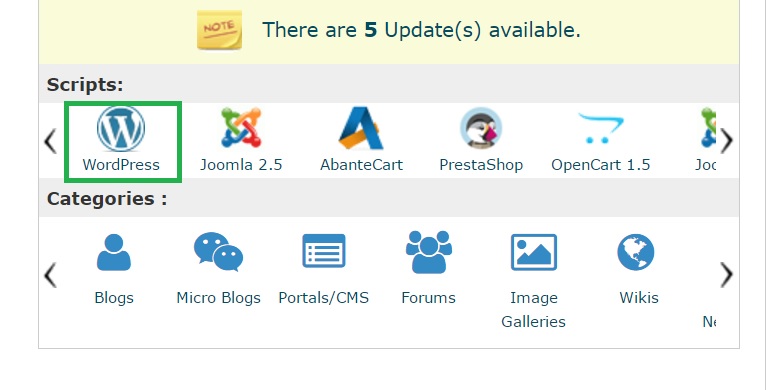
Click Install. You’ll then see this screen:
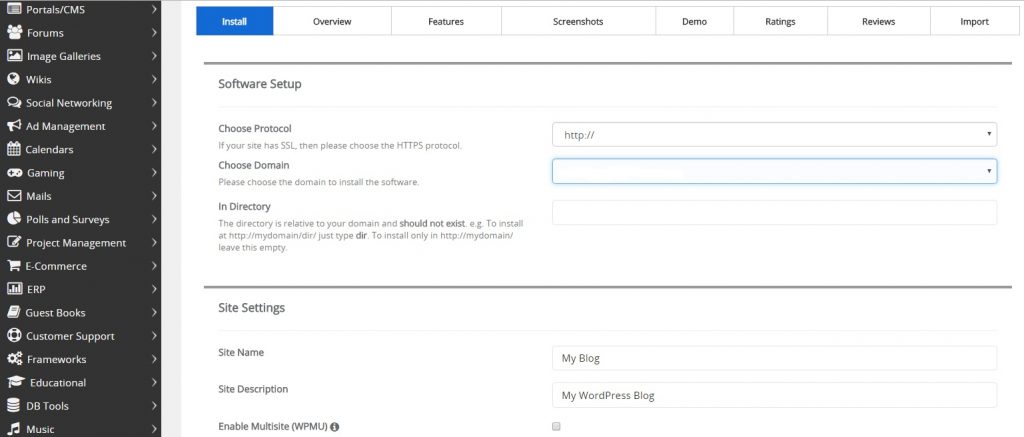
Complete the fields as I have outlined them below.
Choose Protocol: Leave default
Choose Domain: Click the dropdown and find your new domain.
In Directory: Leave blank
Site Name: You can either leave this blank, or name it after your domain. “Iron Fist Apparel” (This can be changed later)
Site Description: You can either leave this blank, or give it a short description. “The Best T-Shirts For Strong Willed Entrepreneurs” (You can change this later, too)
Next, you’ll need to create credentials for you (the administrator), to log into the backend of your WordPress t-shirt store. Make sure and use a secure password, and document the credentials somewhere safe.
Admin Email: If you haven’t created an email account yet, you can always log into cpanel later and create one. For now, set this to an email address you frequently use.

Skip everything else and scroll to the bottom, and click Install. It should only take 3-4 minutes for WordPress to finish installing, and will display a 100% completed message to notify you.
Once it does, navigate to your domain http://YourDomain.com. You will see a very boring black and white “Hello World” website. This is Wordpress at it’s most basic form.
Don’t worry – once you install a theme over this, it’ll look just like the theme your purchased.
Installing The Theme
Type in http://YourDomain.com/wp-admin.
Enter the admin credentials you just created. Once you’re “in”, you’ll are actually in the “backend” of your WordPress site. This is where you’ll spend the majority of your time.
Here’s where you install your theme, add plugins, create products, fulfill orders, or change any settings.
Install the theme by:
- Appearance > Themes > Add New > Upload Theme.
Navigate to your theme file. (this is the file you extracted earlier after purchase). This part can be a little tricky. You must upload the .zip version of your theme.
Every theme packages their files a little differently, but basically your goal is to drill into the folder until you find a ThemeName.zip file.
In the case of Shopkeeper, I have a shopkeeper.zip, and shopkeeper-child.zip. Choose the parent “shopkeeper.zip” file. After the parent has been installed, do the exact same thing again and install the child theme. Make sure and hover over the child theme and click the Activate button afterwards.
If you’re theme doesn’t have a child theme file, don’t worry about it. You can continue either way.
That’s it!
Your theme is now successfully installed. If you navigate to your website now, it should look very similar to the demo. If your theme does have demo content, you can go ahead and import that so you don’t have nearly as many pages to create manually.
Learning The Sidebar
In your WordPress admin panel, you’ll see all kinds of menus. You won’t need to use all of them – but here’s the main ones you’ll be using.
 Posts
Posts
If you were to start writing blog posts for your store, this is where you would do that.
Media
This is where any photos or files you upload are stored. You can either upload files here, or upload them as you create products.
Pages
Pages are static. Homepage, About Us, Contact Us, Sign Up, Shop are all examples of pages.
Comments
If you write blog posts and allow comments, this is where all comments will shop up.
Appearance
> Themes – This is where you install your theme file. This is also where you’ll enter in you theme file activation code (which is located in a .txt file alongside your theme, or you can find it under your downloads on Themeforest)
> Customize – This is where you’ll spend a lot of your time. Under Customize, you can upload your logo, edit your site title, fonts, text colors, size. Again, if you purchased a theme with demo content, a lot of this is set for you.
> Widgets – Widgets are blocks that performs a certain function. You typically see them on the right-side of a webpage. It may include email signup forms, advertisements, an About Me widget, etc.
> Menu – Menus are located at the very top or bottom of a page. Here you can add pages to “pin” to you menu, create sub menus, or rearrange the menu order. Here’s the items I included in my menu on Merch Pursuits: Home, All Posts, Income Reports, Resources, and Contact.

You can rename a menu item to whatever you want. My “All Posts” menu item actually links to my https://merchpursuits.com/blog” page.
Demo Content
If your theme came with demo content, go ahead and import it. You can check by going to Appearance > Themes >and selecting your theme. You may be required to enter in your activation code on this page for any support from the developer. You’ve already download the Purchase Code once you downloaded all files from Themeforest.
Importing demo content will create a bunch of different pages for you. Go ahead and delete any pages you don’t think you’ll use. Any lorem ipsum blog pages. Any example portfolio pages.
Some themes will have 10 different “Home” page layouts for you to pick between. Choose the one you want to use, and delete the rest.
Customizing Your Site
Now that you have your domain hosted, you have your theme installed, and understand the basics of WordPress, you need to customize your site.
The main things you’ll want to change is the site title, site description, your top menu, your footer, & setting up your “homepage”.
Most of this can be accomplished by playing around with the settings in Appearance > Customize. Every theme is different, and everyone has their own personal preference, so you’re on your own as far as customizing the site.
Installing Necessary Plugins
As I said earlier, in order to create a t-shirt store, we will need a couple plugins.
Woocommerce and Printful.
Woocommerce provides the backend for us to create the product variations, and Printful allows us to fufill the orders once a customer places an order on our site.
You can search for these plugins by clicking “Plugins” on the sidebar, and then Add New.
We’re going with Printful based on personal experience, recommendations from other Merch sellers, quality of t-shirts, and consistency in prints.
Install SSL Certificate
You’ll be responsible for everything related to the safety of your store.
If you plan on taking payments on your website, you need to install an SSL certificate. Woocommerce will not let you take payments until it’s configured correctly. To purchase & install your SSL cert, read these guides:
You may need to reach out to a Namecheap support employee for assistance with this part. Basically, you send off the required information to an SSL vendor, they verifiy the info, and send you a cert for you to install.
Integrate Your Site With Printful
Once the SSL is installed, all you have to do is connect your website to Printful to auto-fulfill any orders, and configure Stripe within WooCommerce to accept payments
Printful has already created a very helpful guide to help you integrateyour site, so I won’t reiterate the steps in this post. The video was very easy enough to follow: https://www.theprintful.com/landing/woocommerce-print-products-fulfillment
Once you’re connected – you can start adding products and syncing them with Printful. You will be creating products on Printful’s site, and pushing them over to your site using the Printful Integration plugin. Here’s another video they made to help with this step: https://www.youtube.com/watch?v=poR0kGXVtXE
Set Up Stripe
Once you have Woocommerce installed, you need to integrate it with a payment processor. You can either use Paypal or Stripe. I prefer Stripe because it’s simply just a “handshake” between your website and Stripe’s, so it’s super easy to set up. Just copy over the API and secret keys, and you are good to go.
Head over Stripe.com and create a new account.Then, follow these instructions from Stripe set up in WooCommerce: https://docs.woocommerce.com/document/stripe/
How You Get Paid
At this point, you should have a functional WordPress website. Aside from adding products, you’re done. From here on out, all you have to do is add new products, and you can start getting paid.
Printful products are printed on a one-off, on-demand basis. That means that you only pay when an order comes into your store. If you’re looking for a true no-inventory solution, without the monthly costs of Shopify, following this guide should get you started.
Here’s how Printful‘s billing system works:
- A customer purchases a product from your store, and they pay you using your store’s payment platform.
- The order comes through to us from your linked store automatically, and then Printful bills you for fulfillment of that order.
- You keep the difference. (note: you will have to pay Printful before your customer’s money hits your bank account)
If you sell a shirt for $19.99 on your site, you will receive $19.99 (minus transaction fees) on that order. Printful then bills you $14 (made up amount) for fulfillment + shipment of that shirt. You get to keep the difference. Once you start driving traffic and sales to your website, these commissions really start to add up!
Finishing Up
Creating your own WordPress t-shirt store opens up a world of possibilities for you to explore. You get to experiment with web design, drive traffic from outside sources, create SEO-friendly blog posts for organic Google traffic, and adding as many or as little products as you want! You aren’t limited to just t-shirts, either
Like I said, it’s a slow and steady process. Just focus on getting a few more customers than last month. As long as you can grow steadily, so will you and your brand. You are essentially creating a dropshipping store. It’s a low-risk, high reward venture, but you’re responsible for your own traffic and getting your customers to convert.
I plan on creating another post with step by step instructions on how to add products to Printful, but I think this is more than enough information for you to digest for now. For those of you looking to get started right away – the video links I posted should help you out.
I’m always here if you need any WordPress help. If you’ve had success creating your own store, let me know in the comments!
Get some t-shirt idea inspiration below!


