Hey guys! I’m Danny.
Welcome to my website Merchpursuits.com – the website dedicated to helping you start, grow, or expand your Merch by Amazon business.
I haven’t seen many quality Merch by Amazon tutorials or guides yet, so I decided to dedicate this website to it.
So now, I’m here to help you -for free! No e-courses, no paid subscriptions, just quality Merch By Amazon material for you to use. Follow along to be emailed whenever I make a new post, income report, or guide. And don’t forget to check out my Merch Resources page to see what tools I use to create shirts, get t-shirt inspiration, and for some killer font and vector deals.
Enjoy!

So, What is Merch By Amazon?
Merch by Amazon is an on demand t-shirt printing service. It allows you to create and list t-shirt designs right on Amazon – for free. Gone are the days of ordering t-shirts in bulk, shipping them to Amazon using their Fulfillment by Amazon(FBA) service, and waiting to see if they even sell.
This what a Merch by Amazon listing looks like.
With Merch by Amazon, you get paid on a per shirt basis. There is literally no upfront cost to do this. You just upload your design, set a price and colors, and let Amazon do the rest. Your royalty depends on the price you set.
Merch by Amazon is specifically for t-shirts at this time, but if the name is any indicator, they will be branching into all forms of branded merch in the future. Some of us have even received a survey asking what types of Merch we would like to sell in the future. Merch by Amazon will be huge, guys. The time to get started is now.
Now, there’s a few tips and tricks to becoming successful with Merch. You could just create a bunch of t-shirts and see what sells, but you’ll probably waste your time. You could also create t-shirts you like, but again, no one else may think so.
Or, you can take the smarter approach and create t-shirts you know people will buy. In this guide, I’m going to show you how to get started with Merch By Amazon.
Let’s get started!
Step 1: Get Your Account
Merch by Amazon was extremely popular when it first launched. Amazon was flooded with hundreds of members and thousands of unique designs almost overnight.
As a result, the only way you can join is by signing up to a waiting list. This waiting list can be anywhere between 3 weeks and 3 months.
The best thing you can do is sign up now. Absorb as much of this knowledge as you can while you wait your invitation. It sucks, trust me. I waited a few months myself.
Once approved, you’ll log into your account here. Before you can list designs and get paid, Amazon will ask for some basic information about you.
After that, you should see a screen this:
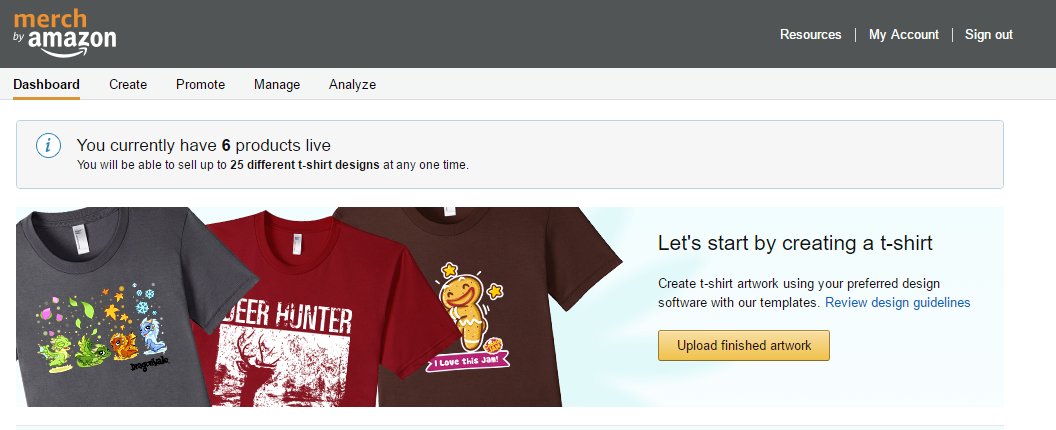
This is your Merch Dashboard. Here you can upload designs, promote your t-shirts, analyze sales, and much more.
More on the Dashboard later.
First, let’s go over the tools you need to get started.
Things You Need
- Adobe Photoshop (or GIMP)
- Merch by Amazon Account
- A little creativity
Step 2: Make a Gameplan
Before you can start uploading designs, you first need a plan of action. You need to know which t-shirts to go after. Like I said, you could just create designs you like, but there’s no guarantee any of those will sell.
Consider these:
- Your target audience
- Will you be doing quotes, or images, or both?
- How do you come up with T-shirt ideas?
- Which shirts are the hottest sellers?
- How familiar are you with Photoshop?
Don’t worry if you aren’t familiar with Photoshop or GIMP, I’ve created several video tutorials, as well as several posts specifically for creating unique, professional Merch by Amazon t-shirts at the end of this post.
Once accepted, you are limited to 25 designs. Sell 25 shirts, and you’ll automatically be upgraded to the next tier.
Merch Tiers
You start out, you’ll have the ability to create 25 designs. Once you sell 25 individual t-shirts, you’ll be upgraded to Tier 2.
It doesn’t take a genius to tell you the more designs you have, the bigger the more money you can make.
The first 25 designs are critical to your success. You don’t want to be stuck with only 25 designs and not sell a single shirt. Quality research for these first 25 shirts ensures you’ll get bumped up to the next tier. After selling 25 shirts, you’ll have a better idea of what shirts are selling better for you and you continue to create designs in that niche.
Here’s what the Merch tiers look like:
Tier 1: 25 designs.
Tier 2: 100 designs
Tier 3: 500 Designs
Tier 5: 1000 Designs
Tier 6: 2000 Designs
Tier 7: 4000 Designs
Pro: Invite Only.
I personally think a tiered system like this is a good thing. It rewards those whoare creating quality t-shirts. It also helps prevent spammers from uploading 10,000 designs and destroying any chance you have of being successful.
Step 3: Recognizing Merch T-Shirts
Before you start doing any research, you need to recognize what a Merch listing looks like. If you didn’t click the link earlier, click it now because this is important when doing research.
Once you know what to look for, you can check the BSR (best selling rank) of the shirt to see how well it is selling on Amazon. I use a tool called MerchData.io to get live, accurate Merch sales data.
All Merch listing have two things in common: a sizing chart (see below), and a visible white tag.
See below.
Sizing Chart
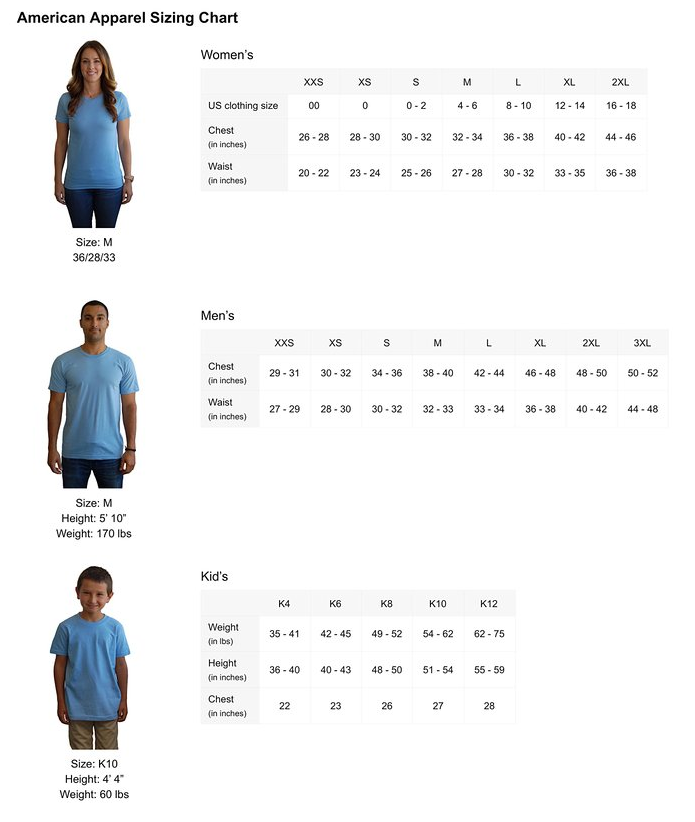
Visible White Tag
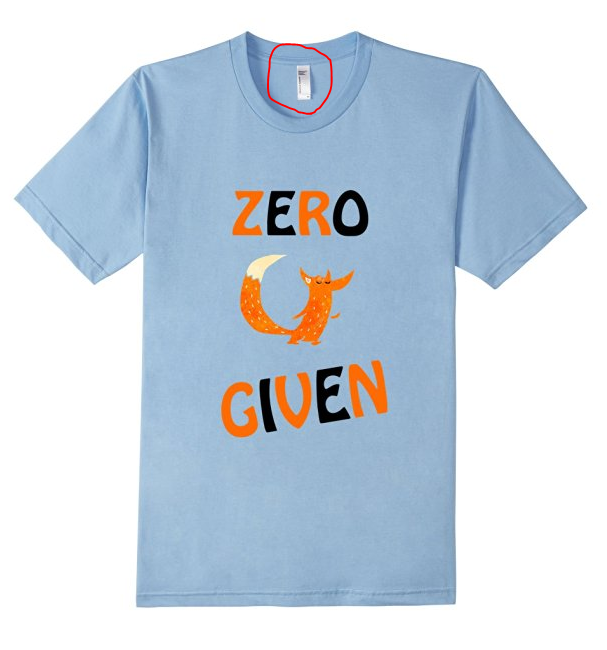
Sidenote: any listing with a person wear a t-shirt is not a Merch listing.
Step 4: Understanding Amazon Best Sellers Rank
Now that you know what Merch shirts look like, you need to determine how well they are selling. You can do this by checking the Amazon Best Sellers Rank of that shirt.
Find any Merch shirt, click into the listing, and scroll to the Product Description section. If you’re on the Amazon app, scroll down and click into the “Features and Details” section.
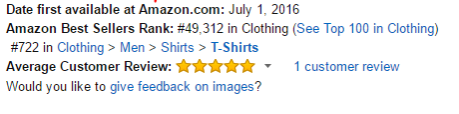
If you don’t see any ranking, that means a grand total of 0 t-shirts have been sold.
Generally speaking, I only go after t-shirts that are under #100,000 BSR. One would expect a t-shirt around #100,000 BSR to sell one t-shirt every few days. Anything #50,000 and lower is probably selling a few shirts every single day.
The goal is to use these designs for inspiration. You should never straight up copy a design. Use different vectors, different fonts, or different layouts. You want to create a design that is similar, but different. Make your design stand out among the competition.
The example above would definitely be a great choice. Every time you come across a winning quote or design, add it to a list. Your goal is to come up with at least 25 designs, around #100,000-#150,000 BSR, to use as inspiration.
Step 5: Check the Competition
Let’s say you found a good t-shirt with just under #100,000 BSR. You enter it into Amazon and see 264 listings, all with the same quote.
Would this be a good t-shirt to target?
In most cases, no.
The t-shirt may have a low BSR rank, which is what we want, but it doesn’t account for a couple things: Competition and Optimization. It doesn’t matter how amazing your design is, you still have to fight with 264 other sellers to make a sale. If you see quite a few sellers in the same low BSR range, you have a fighting chance with that design. If you only see 1 shirt with a low BSR, but 10 pages of no ranks/really high BSR – you’ll want to find a new design.
Couple things to note here. All Merch shirts are placed in the Clothing, Shoes, & Jewelry > Novelty & More > Clothing category. For this example, I’ll be using the quote”Zero Fox Given t shirt”. If you enter that quote directly into Amazon, you’ll see listings from all categories – including all of the Amazon FBA shirts.
You do not want to do your research from the homepage of Amazon. You want to do it from Novelty & More category. I go into more detail about that in my Writing Better Merch Bullet Points post.
I use an awesome Merch tool called Merch Informer. Whenever I type in a search term into the tool, it automatically searches the Novelty & More section.
Once you have 25+ ideas, quotes, or designs, it’s time to create your first t-shirt!
Step 6: Creating Your First T-Shirt
Since many of you probably don’t have your Merch invite yet, I’ve included the template files for you to download. This will let you create your designs while you wait for your invitation.
In this tutorial, I’ll be using Photoshop CS6, however, any version of Photoshop will work.
Don’t have Photoshop?
Here’s your alternatives:
- GIMP (free)
- Adobe Creative Cloud Photoshop CS6($9.99/month)
- Vexels
If you’ve already received your invite, you can download these templates from your Dashboard.
After opening the template, you should see this:
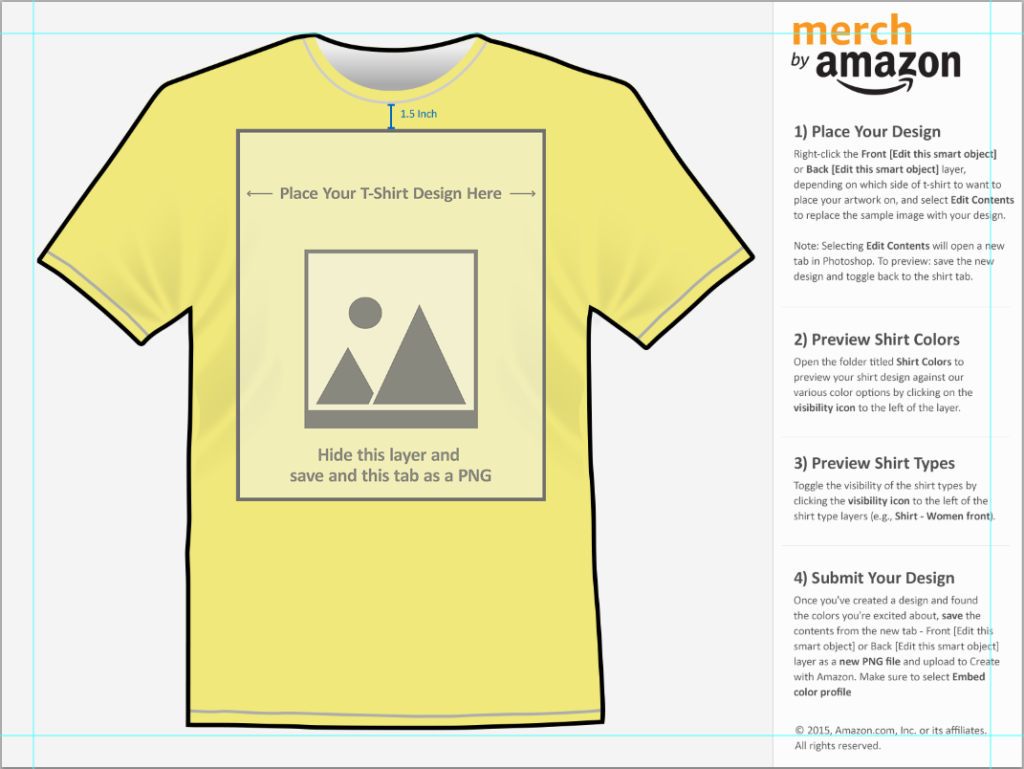
It’s pretty straightforward from here. For Photoshop CS6, just right-click on the “Front” layer on the right hand side and choose “Edit Contents”.
Delete the sample image layer. This will leave 1 layer remaining.
From there, the design is completely up to you. Add vectors, quotes, or whatever you want. If you’re using images or vectors, make sure to use a high quality image or else it will look stretched and pixelated.
Then, click Save (not Save As). You can return to the t-shirt page and see what it will end up looking like on a shirt. If you like it, and want to upload it to Amazon, save it as a PNG somewhere.
I ALWAYS save as a PSD (an editable photoshop file), as well as a PNG. This way, if I ever want to tweak the image, change the color, use the same layout for another design – I don’t have to completely recreate it.
I won’t be going over how to use Photoshop in this tutorial, but I’ll be uploading videos to my Youtube channel where I walk you through step-by-step on how I create a t-shirt, or read my Using Photoshop for Merch by Amazon Tutorial.
Merch Research Tools
Here’s the top 4 tools I use for researching merch by Amazon t-shirts:
SpyAMZ
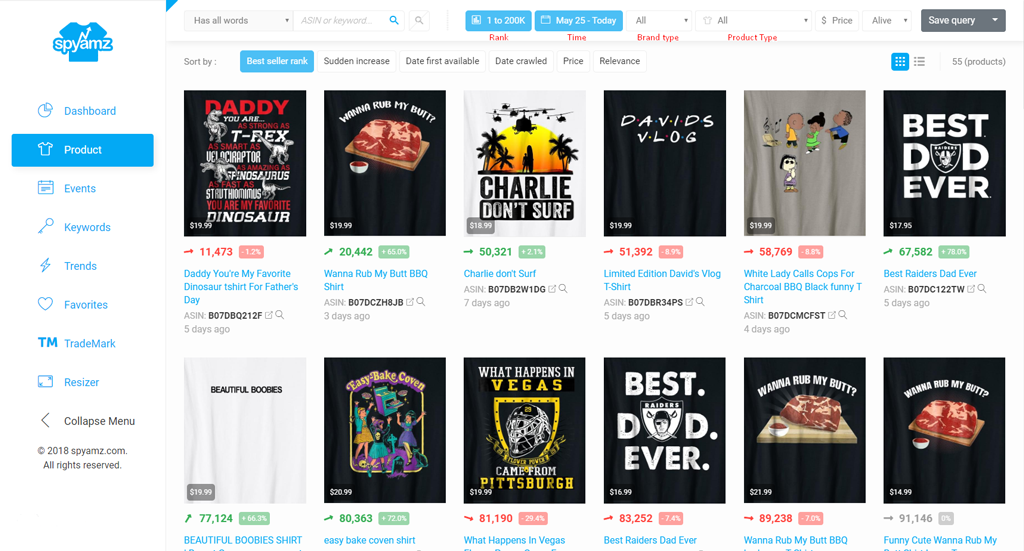
SpyAMZ currently has the largest Merch by Amazon shirt database, with 9 million designs and updates every few hours. In general, you can search in SpyAMZ database with many advanced filters such as Best Seller Rank, Sudden Increase, Rank range, Time range, Official/Unofficial brands, and more. There is an Events tab which shows all the upcoming events you could use for t-shirt designs, and a well-organized Favorite tab to manage your tracked items and ideas.
Moreover, this tool also includes Keyword Analytics which lists all the most appeared keywords in Merch T-shirts. This should help in optimizing your listings. You can easily check Trademark for your designs with SpyAMZ, as well.
Use Coupon Code MERCHPURSUITS for 30% off lifetime price!
Merch Informer
This is another go-to tool for researching, organizing, and looking up t-shirt competition. Anyone who’s serious about making money with Merch uses this tool.
Try Merch Informer free for 3 days here!
Merch Buddy
The fastest way up upload Merch by Amazon designs. Seriously, this is the best $20 I’ve spent on a Merch tool so far. It allows you to copy the product details from 1 listing and paste them into as many open tabs as you have open.
Read my Merch Buddy Review here!
Amazon.com
Yes, I use Amazon.com directly for the majority of my research.
You can find the full list of tools I use here.
Pretty Merch
The best research you can do is create more of what’s already selling. Use Pretty Merch to quickly and easily see which kinds of shirts are selling best for you, which gender, color, and target your research accordingly.
Both free and paid options are available. Download the free Pretty Merch Chrome extension here!
You can read my in-depth Pretty Merch review here!
MerchData.io
MerchData is one of the first tools I use when researching. It has the most accurate sales data, so I don’t need to worry about chasing old, historical data.
Copyright
Do not infringe upon copyright with Merch. All of your designs go through an approval process anyway. If you are using a copywritten term, image, or quote, you risk your entire account be shutdown without warning.
You’ll see a lot of it going on. And it may make some people a lot of money. But make no mistake, you will get caught, banned, and lose all the money you made.
If you aren’t sure if it’s been copywritten, check out Trademarkia or the USPTO.gov website.
Quotes or images from TV shows or movies are usually off limits.
Finding Vectors
One of the hardest parts about designing your own t-shirts is finding vectors. Many sites are hard to navigate, or it’s hard to determine if the vectors are available for commercial use or not!
Vexels.com makes it super easy and is the #1 place I go to to find Merch Ready vectors, graphics, or artwork.

Merch Idea Research
There’s a lot of ways to get t-shirt inspiration. Remember, the goal isn’t to copy another sellers shirt – it’s to stand out. Standing out will help you differentiate your design from all the similar designs of other sellers.
Here’s a few techniques I use:
Search Latest Merch T-shirts
Go to Amazon.com, and drill into the Merch listings category. Clothing, Shoes, & Jewelry > Novelty & More > Clothing. Sort by “Newest Arrivals”. Now you can see what other Merch members have just posted.
Click here to see what it looks like.
Chances are they’ve gone through some kind of Merch research as well.
Every Merch shirt will have the same bulleted phrase:
“Lightweight, Classic fit, Double-needle sleeve and bottom hem”
Copy that into the search bar on the Amazon homepage. This will display all shirts uploaded by other Merch members. You want to scroll to find listings around #200,000 or less, and then create a t-shirt around that. The DS View plugin is very handy if searching this way.

View A Seller’s Store
With Merch by Amazon, you can create 1 “store” for all your shirts, or 25 stores each with different store names. It’s up to you. If you find a design you like, and it seems like it’s selling well, view the seller’s other tees. They could have a gold mine of inspiration for you.
Enter the T-Shirt into Google
There’s a good chance you can find inspiration on other t-shirt websites like Teespring. Just Google the quote+t-shirt. Other websites to check are Printful or RedBubble, Pinterest, Reddit, or Etsy.
Google Trends
Google Trends is awesome. You can view the most trending keywords on the web, or enter your own. It you see a steady decline for the keyword, chances are people won’t be buying t-shirts around it, either.
Finishing Up
There you go guys! This tutorial should get you started with the basics of selling on Merch by Amazon. I hope it helps you create a bunch of cool designs that sell well. And the best part is, because Amazon is such a behemoth of a site, you don’t have to do any advertising to make sales. That’s why I stress that research is the key to success.
And sign up here to follow my journey and view monthly income reports!
Good luck! If you have any questions or comments, feel free to comment below!
Also check out these articles:
Optimizing Keywords and Product Descriptions
How To Do Merch by Amazon Research
Organization Tips for the Merch Seller